Shenzhen Zhichong Electronic Technology Co. , Ltd.
AF-9119Auto focus machine
-User Manual-
AF-9119Auto focus machine
-User Manual-
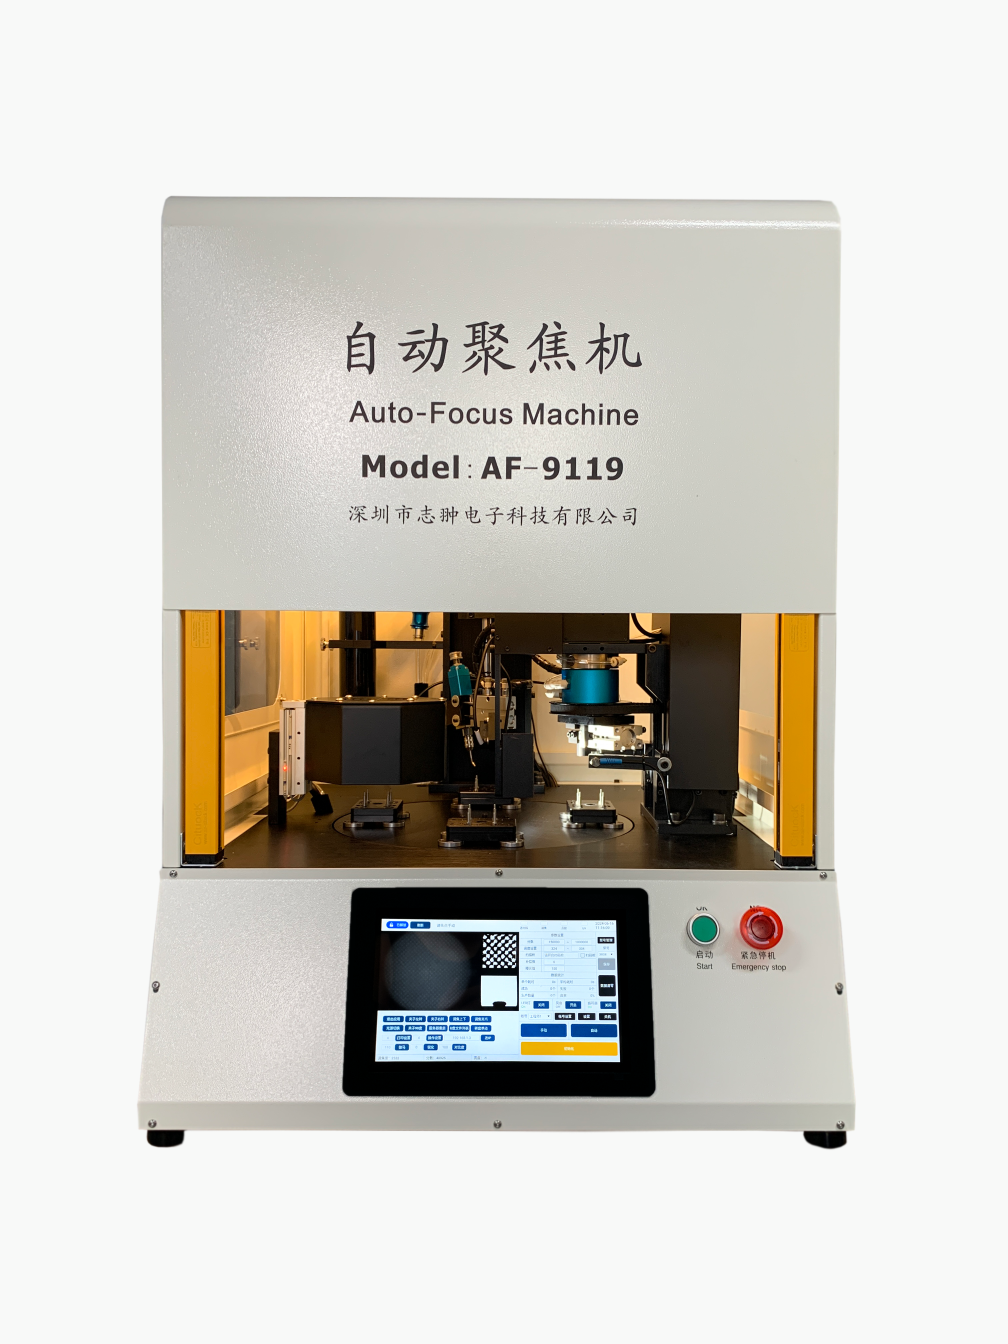
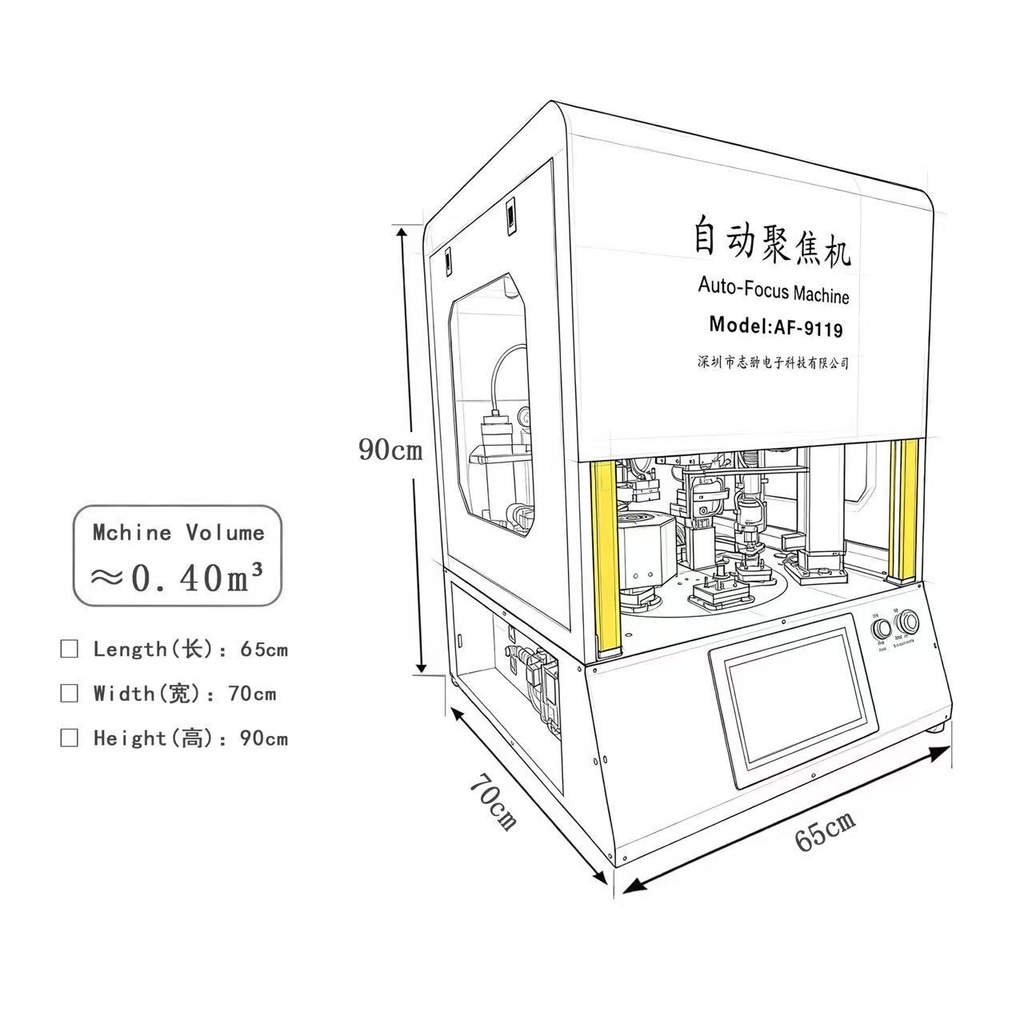
| 1、AF-9119Automatic Focusing Machine Parameter Specification Table | |||
| NO | name | parameter | remarks |
| 1 | Appearance size | 70*70*94 | CM |
| 2 | weight | 110kg | |
| 3 | Power Supply | AC220V 50Hz | |
| 4 | power | 350W | |
| 5 | pressure | 4kg/c㎡ | |
| 6 | control mode | touch screen | |
| 7 | Single product completion time | 6.5S | 550 per hour |
| 8 | Numerical Control Motor Motion Parameters | 8000 | |
| 9 | Pulse accuracy of the divider | 0.00002 | |
| 10 | Torque | 500gf*cm | |
| 11 | CCDImaging accuracy | 0.002 | |
| 12 | Optical instrument magnification factor | 150 | |
| 13 | Image acquisition accuracy | 1:1 | |
| 14 | Glue dispensing method | Pneumatic | Single point/Two point/Three point/Four point/Arc/One circle |
| 15 | Glue type | UV glue | |
| 16 | Glue dispensing accuracy | 0.01S | |
| 17 | Curing method | UV lamp | |
| 18 | Purple light lamp type | UV point light source | |
| 19 | Purple light wavelength | 365nm/395nm | |
| 20 | Purple light lamp power | 4000mw/c㎡ | |
| 21 | Requirement for torque between lens and lens mount | 200-500gf*cm | |
| 22 | Function:
|
550 per hour | Integration of height recognition and automatic focusing |
2、Equipment usage environment and precautions
1. Usage environment:
1.1 Environmental temperature: -10℃ +55℃
-
- Relative humidity: not exceeding 85%
- The equipment needs to be used in a dust-free environment
2.1、The impact of IR-CUT on focusing accuracy:
① The pendulum type IR-CUT is a double-layer structure, which combines the upper and lower covers with screws. If there is a loosening of one thread (0.01mm) between the upper and lower covers, or if there is a loosening of one thread (0.01mm) between the lens and the IR-CUT thread, for a small lens with a pitch of 0.5mm (i.e. 50 threads), it is equivalent to a rotation of 7.2 ° angle (360 ° angle ÷ 50 threads=7.2 ° angle/thread). Angle movement of 7.2 ° on a small lens with a diameter of 14mm is calculated in radians using the formula [2 × 3.1416 × 7mm × (7.2 ÷ 360)]=0.88mm. The thickness of human hair is generally 8 strands. When the lens moves vertically on the IRCUT, it is equivalent to a 14mm diameter lens moving 0.88mm in curvature, which is close to 1mm!!!!!
This instrument can accurately focus and compensate, but if the IR-CUT is not precise, simply moving a wire (0.01mm) is equivalent to a 7.2 ° angle shift and a 0.88mm arc shift, and the focusing and angle compensation done by the instrument will all become inaccurate! To achieve precise focusing accuracy when using an automatic focusing machine, customers must put effort into the lens and IRCUT materials, and prepare them properly!
② There are daytime and nighttime filters in IR-CUT, and their optical characteristics are different. Adjust the focus of the daytime filter, but switch to the nighttime filter and the focus will be inaccurate! On the contrary, when adjusting the focus of the night filter and switching to the daytime filter, the focus becomes inaccurate! When this instrument automatically focuses, the tested module does not need to be powered on. If the IR-CUT is in the nighttime filter state and the instrument is used for focusing, when manually detecting, the IR-CUT will switch to the daytime filter as soon as it is powered on, and the focus will be inaccurate!
4、Infinite focus and angle compensation
① This automatic focusing machine emits high-intensity parallel light, which penetrates through the lens of the tested camera module and directly reaches the target surface of the imaging sensor (CCD or CMOS), and then returns
Automatically focus the target surface image. According to the principle of parallel light infinite optical system, the tested module has been aligned with the infinite focus. Infinite focus is suitable
Any focal length lens. The actual scenery seen at the infinite focal point is more delicate.
② But the security and camera industry has long relied on manual focusing and judgment of images from fixed distance targets, resulting in a focus that is infinite
The far focus is not completely consistent. For this purpose, this instrument provides compensation values to facilitate customers in finding the corresponding compensation values based on their own modules.③ Method for confirming compensation values:
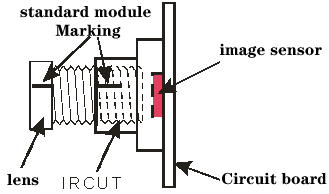
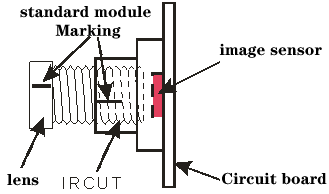
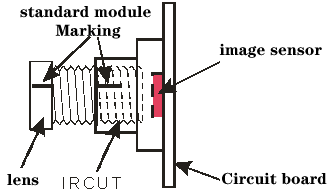
Step 1: Manually adjust a module without blurred edges and corners to the target, and use a blade to make a scale as shown in the following figure.
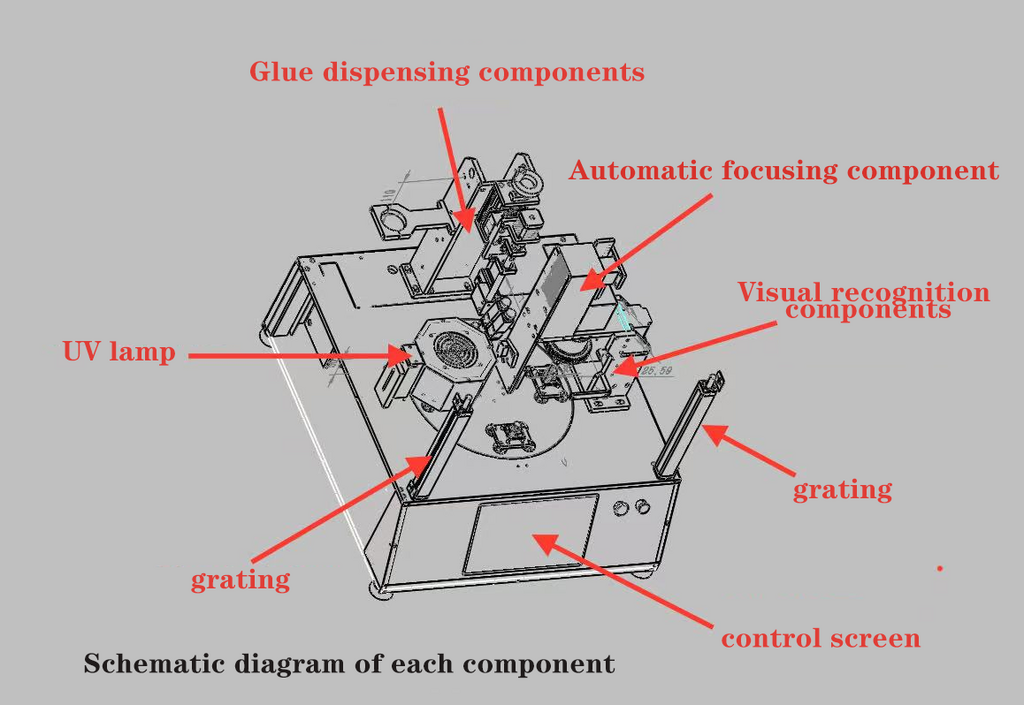
4、 Description of Instrument Mechanism Components
- Touch screen interface function
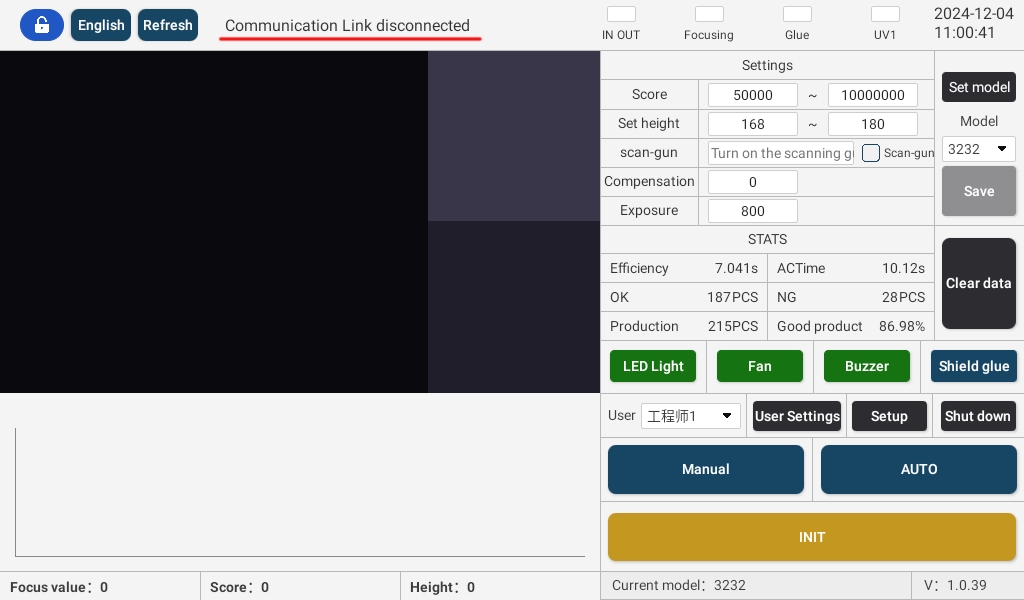
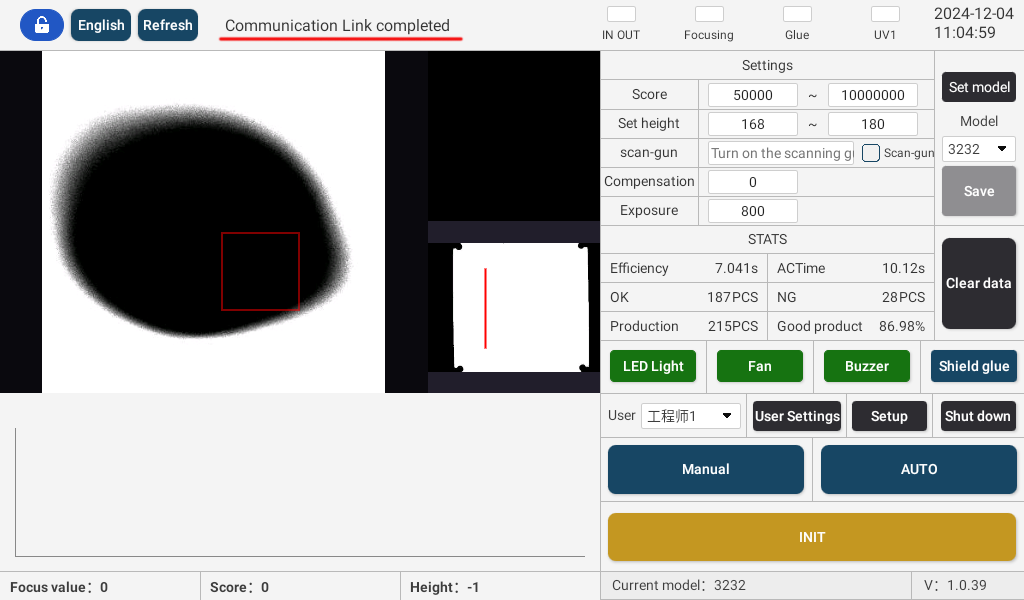
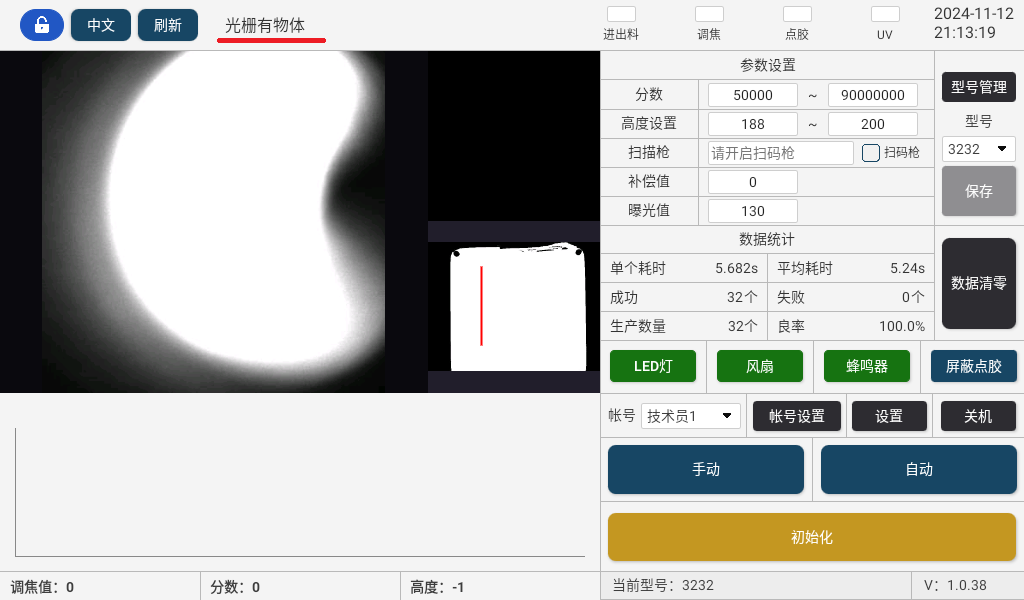
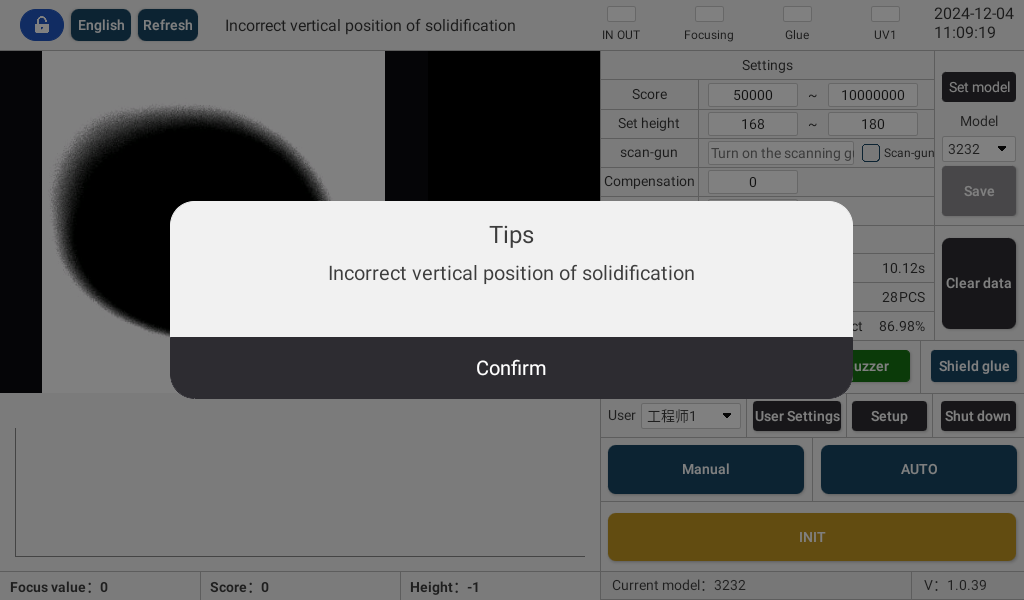
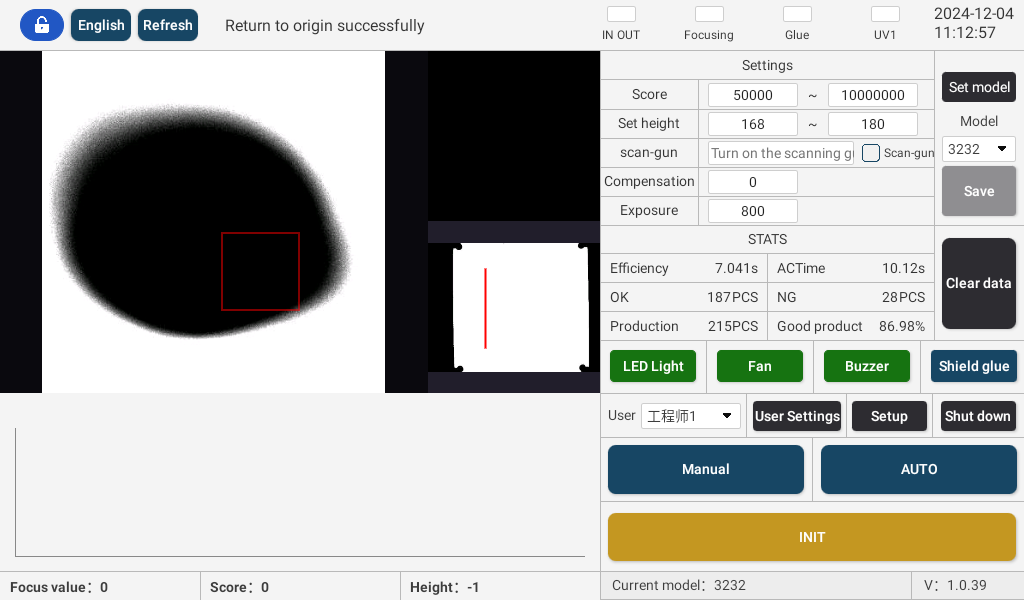
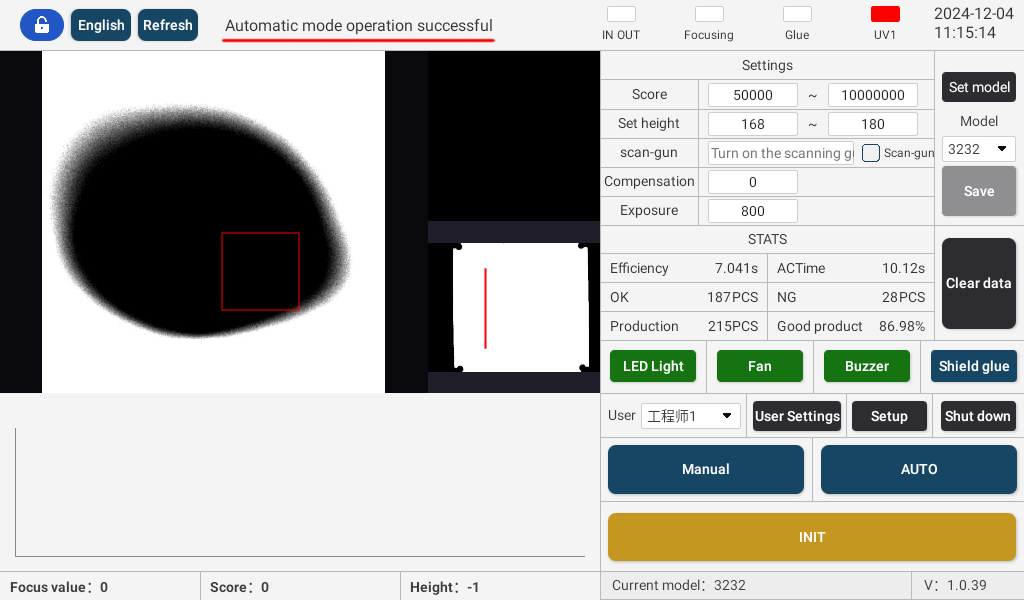
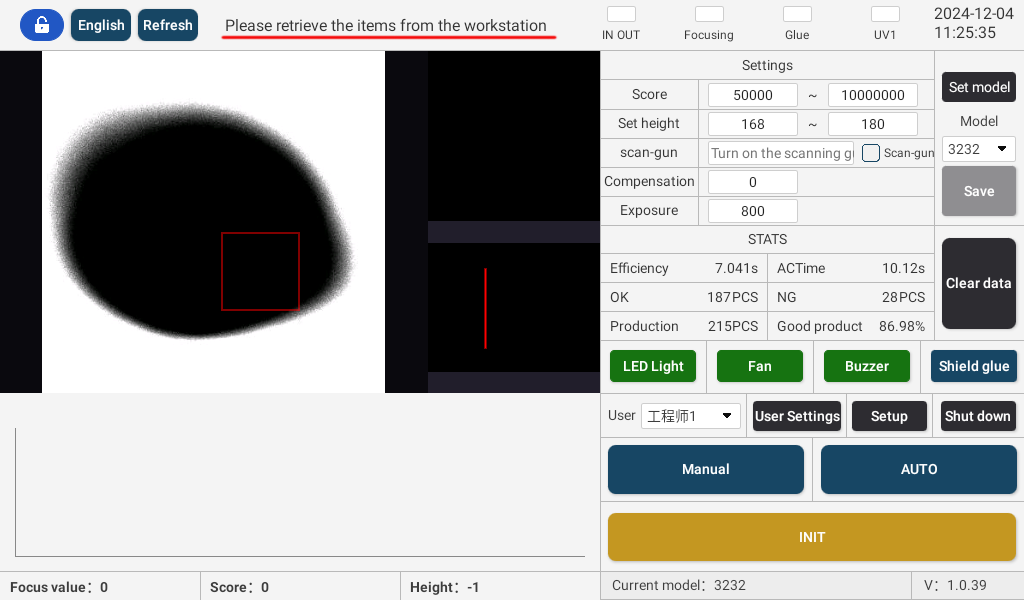
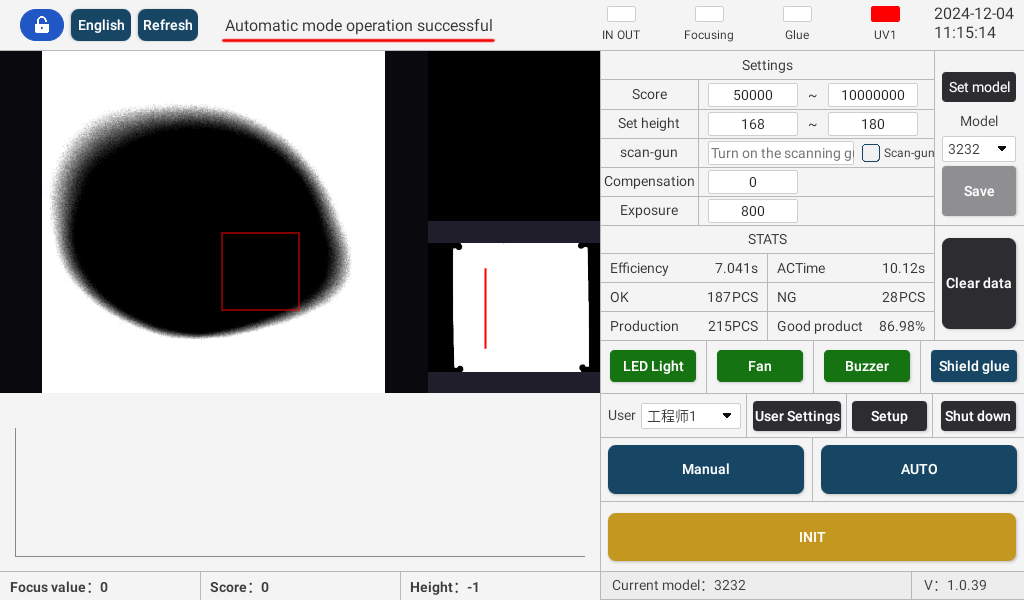
6.-1>When there are modle at the Pick and place position, if the green light is on, it means that the take out material is a product that has been completed and OK. If the take out modle , the green light will turn off, and the modle will be put into automatic operation; If the red light flashes, it indicates that the current material is an NG product. When the red light is an NG product, the buzzer switch will turn on and there will be an alarm sound. If the take out modle is removed, the red light will turn off, put in next the modle will be automatic operation.
-2>At the end of each batch,press the [green key button/start] to operate the current station without material input.
-3>The red button is for emergency stop. Press the red light to turn on the emergency stop button. Turn it to the right to release it, and it needs to be reinitialized after release.
-4>The data statistics column displays the current production data in real-time, including success, production quantity, failure, and yield. This data will not disappear with the shutdown and can be cleared by pressing [Data Reset].
-5>The LED light in the interface is the lighting LED light switch.
-6>The 'Fan' in the interface is the fan switch.
-7>When the buzzer on the interface is a product with a flashing red light NG, the buzzer switch will be activated.
-8>The 'Shield Glue' function in the interface is temporarily turned on or off for dispensing.
-9>The account bar in the interface displays the currently logged in account, and different accounts can be selected for login. Different accounts correspond to different permissions, and the engineer account is the highest authority in the system. It can set all operation parameters, add, delete technician and operator level accounts, and change passwords.
-10>Engineer 1 and Engineer 2 can change their own password and the password of the next level respectively, but cannot change the password of the same level. Technician level can set system parameters, but cannot add accounts or change others' passwords. The operator can only perform simple operations and cannot change any parameters.
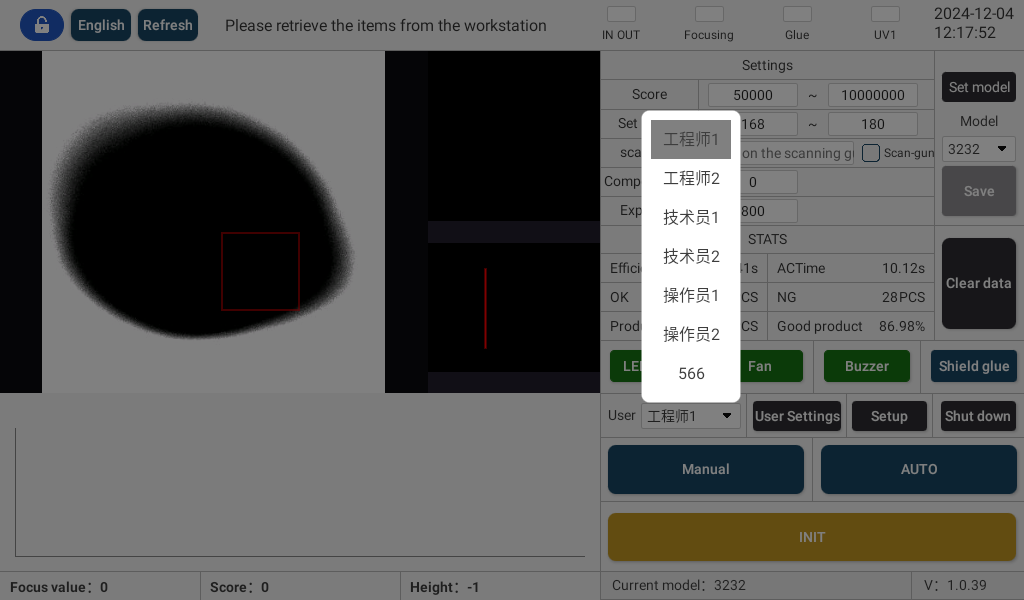
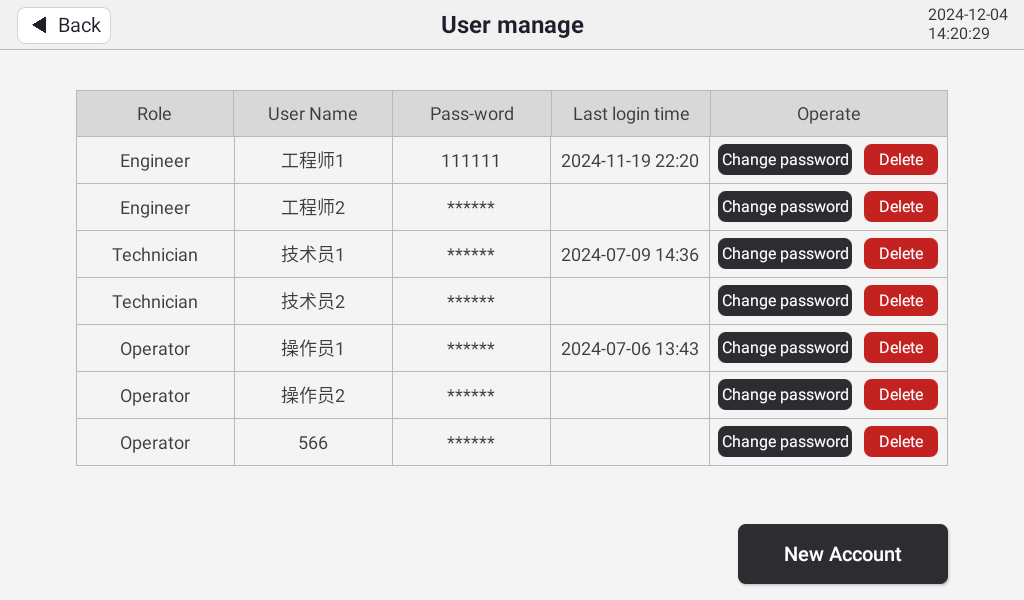
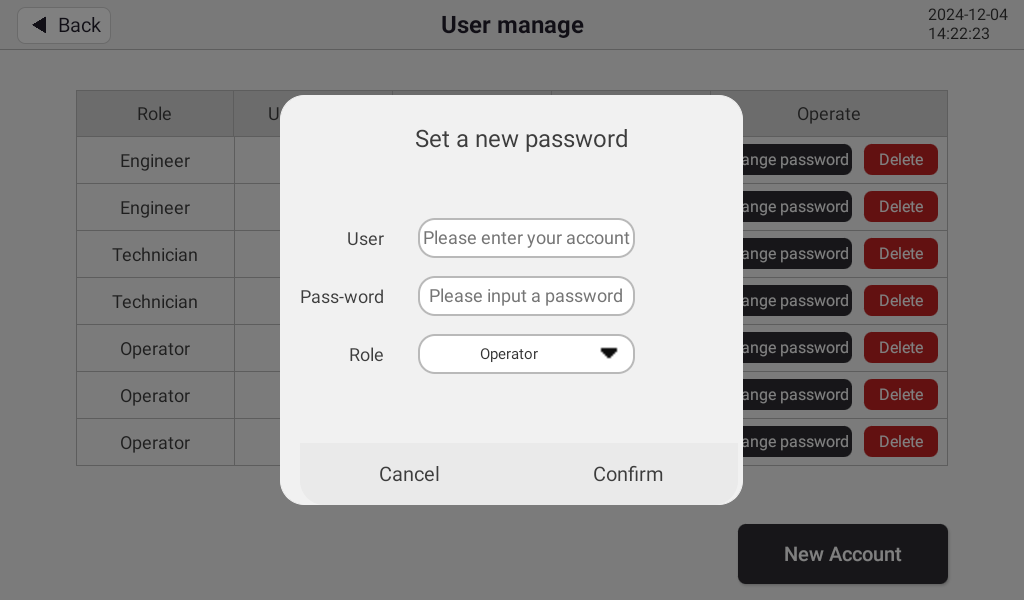
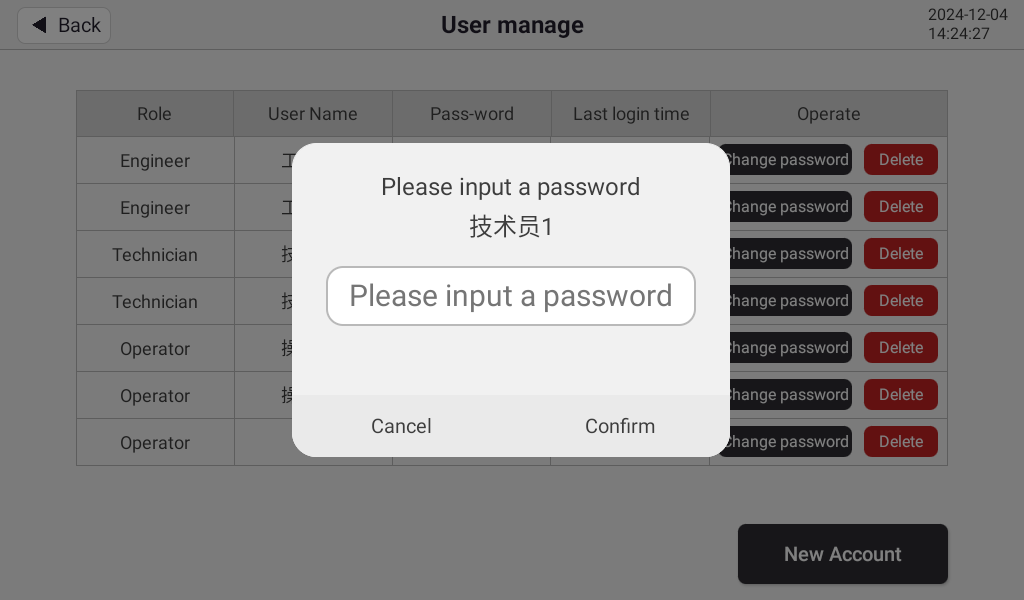
The password for technician 1 is 333333, and the password for technician 2 is 444444.
The password for operator 1 is 555555, and the password for operator 2 is 666666.
Please keep your password safe and do not disclose it casually. After changing your password, remember to back it up to prevent forgetting it
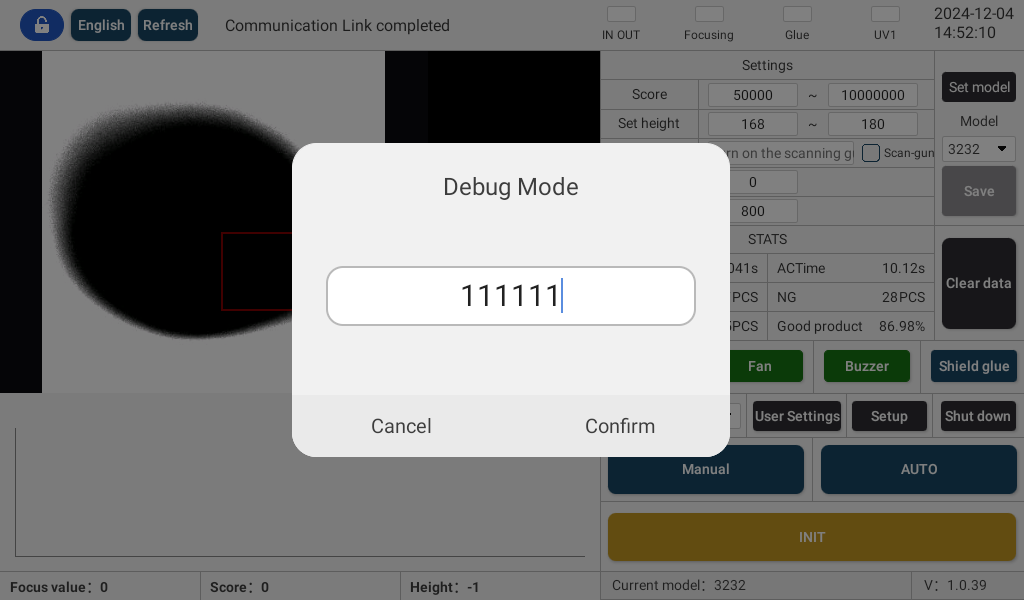
-12>Click on [Settings] and enter the current account password to enter debugging mode to set parameters for each workstation. Parameters can be set in both manual and automatic modes, but manual control must be in manual mode to take effect. If there is no permission, it will prompt that there is currently no permission. Please log in to an account with permission before proceeding with the operation. (Login to engineer or technician account)
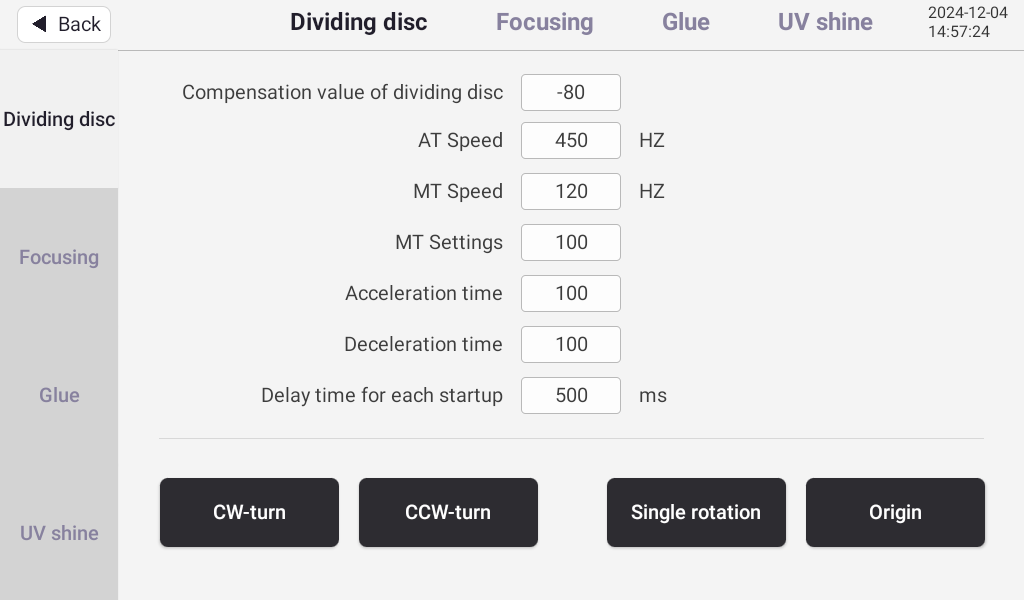
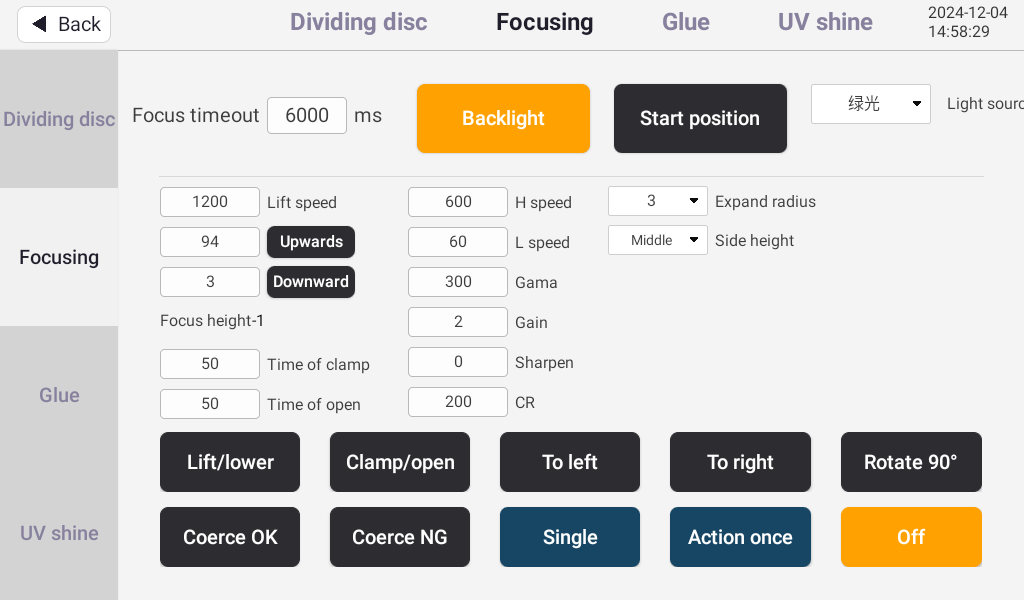
-1>Focusing timeout refers to the situation where the focusing station fails to find the focus within the set time, resulting in a forced stop and NG processing.
-2>The backlight of the height camera can be manually turned on and off in manual mode.
-3>Click on the 'Up wards' button to lower the module of the focusing station and return it to the origin.
-4>Light source switching: Different color light sources can be switched, and some modules require color to find the focus. The default is usually green or red.
-5>【 H/Lspeed】 You can set the speed of the module up and down.
-6>【 Upward 】 You can set the upward stroke of the module. We usually use the product to screw the lens to the lowest position and then push it up to ensure that it can reach the bottom.
-7>The descending height refers to the distance that the module retreats backwards when the focus is approaching the focal point, ensuring that the lens does not exert any force on it when the focus is found, and there is no pressure on the lens when adjusting to the focal point. In manual mode, clicking on 'Up Height' and then clicking on 'Down Height' will run to the lowered height. Clicking on 'Focus Up and Down' will return the height to its original position, and clicking again will run to the up height.
-8>[Focus Upwards] The height will run to an upward height, and clicking again will return to the original position.
-9>[clamp/open] can control the clamping and opening of the focusing gripper.
-10>H speed: It can control the speed of scanning the focus quickly when searching for it.
-11>L speed "can control the speed of scanning the focus slowly when searching for it.
-12>Gamma, gain, sharpen, and CR are settings of the camera, and different parameters have different effects. The default settings generally do not need to be changed, and after modification, the camera can be observed for changes.
-13>Control the clamp manually to turn left, right, and 90 degrees in manual mode. [Forced OK] means that all the current focusing results are forced to be OK.
-14>[Forced NG] refers to the result of the current focusing, which is forced to be NG.
-15>[Single action] In the manual mode, the current focusing station executes the focusing action separately once.
-16>[Ation once] In manual mode, the turntable station can be controlled to rotate once.
-17>[Off] can shield the current focusing station, which is equivalent to closing the focusing station.
7、Click on 'Glue' to enter the dispensing station operation
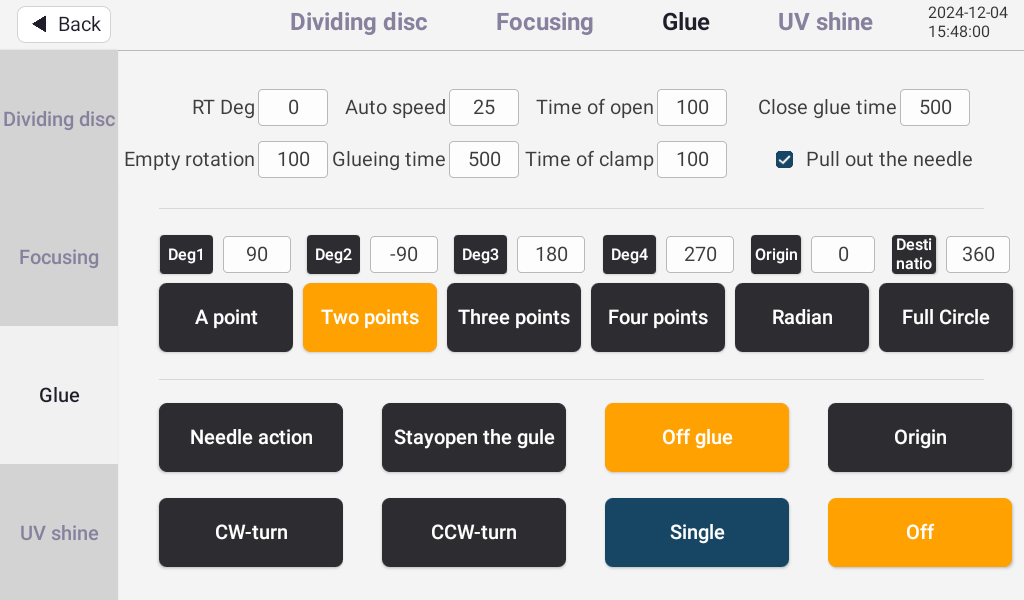
-2>[Empty rotation]The idle speed refers to the speed at which the needle rotates and moves.
-3>When the dispensing mode is circular or curved, the speed at which the needle rotates. The amount of glue can be controlled by speed, and the [glueing time] is the opening time of the dispensing valve, which controls the amount of glue through time.
-4>The clamp opening time and clamp closing time refer to the system control time for the needle to open and close.
-5>Close glue time "refers to waiting for a period of time after the system closes the glue before moving the needle to prevent the needle from having unfinished glue.
-6>[pull out the needle]After selecting, the needle will first exit and then rotate when rotating. If not selected, the needle will rotate directly without exiting.
-7>The starting and ending points of coordinates 1, 2, 3, and 4 are the angle settings for dispensing.
①set【a point】Apply glue at the position of coordinate 1.
②set【two point】Apply glue at coordinates 1 and 2.
③set【three point】Apply glue at the positions of coordinates 1, 2, and 3.
④set【four point】Apply glue at the positions of coordinates 1, 2, 3, and 4.
⑤set【radian】Perform dispensing from coordinates 1 to 2 and dispensing from coordinates 3 to 4 in two radians.
-The dispensing position at coordinates 1, 2, 3, and 4 can be set to positive and negative values to determine whether the motor rotates in the positive or negative direction. For example, 270 degrees in the positive direction can also be set to -90 degrees
⑥set【full circel】Perform dispensing from the starting point to the endpoint, which can be set to a full circle of 360 degrees or to degrees less than or exceeding 360 degrees.
-8>【needle action】In manual mode, the entry and exit of the needle can be controlled.
-9>【stayopen the glue】The glue can be opened continuously in manual mode.
-10>【Off glue】You can turn off the glue separately, and no glue will come out when performing the dispensing action.
-11>【origin】In manual mode, the needle can be returned to its original position.
-12>【CW/CCW】In manual mode, the forward and reverse rotation of the needle can be controlled separately.
-13>【single】In manual mode, the current dispensing station can be controlled to perform a single dispensing action.
【Off】You can close the current dispensing station.
8、Click on 'UV Curing' to enter the UV curing station operation
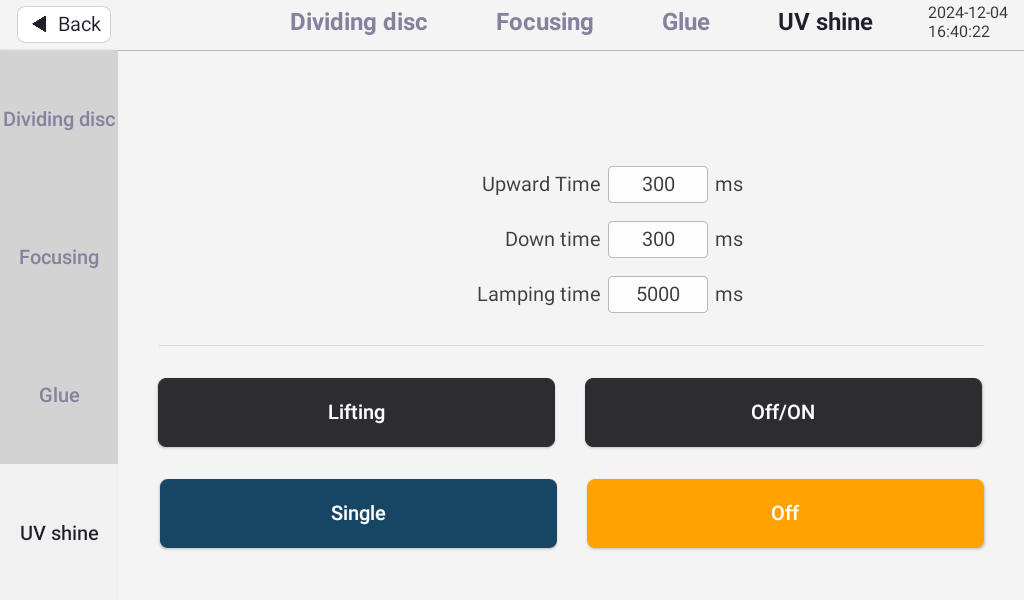
②【Doun time】The system controls the descent time of the cylinder.
③【lamping time】UV lamp automatic curing time.
④【Lifting】Control the up and down cylinders in manual mode.
⑤【Off/On】Turn on and off the UV lamp in manual mode.
⑥【Single】Perform a single solidification action in manual mode.
⑦【Off】Close the current UV curing station.
Clicking on the return button in the upper left corner of any page in debugging mode will take you back to the homepage
(Various parameters set in debugging mode will be automatically saved in the parameters of the current model when exiting debugging mode and returning to the homepage)
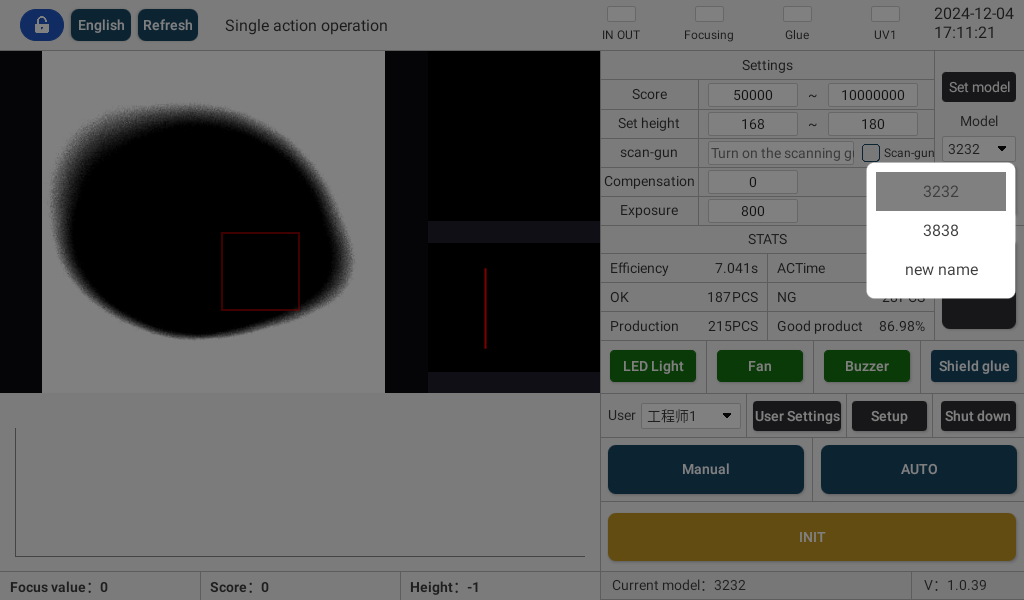
9、Method for setting up new model modules
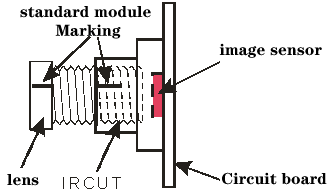
-1>Find two to three modules and manually adjust them, and mark them vertically on the lens and lens mount. Reference (set1 set2 set3)
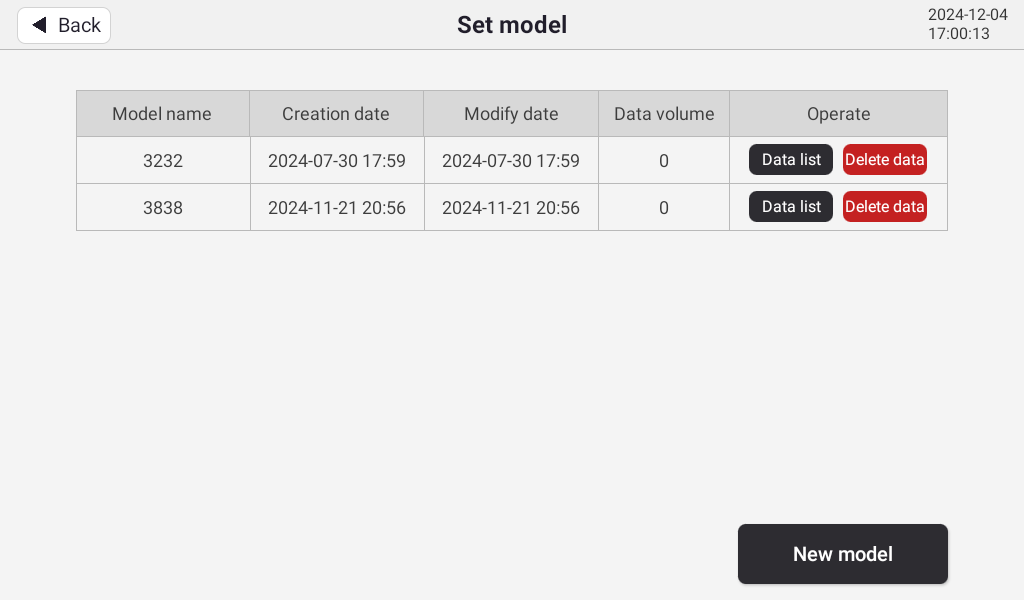
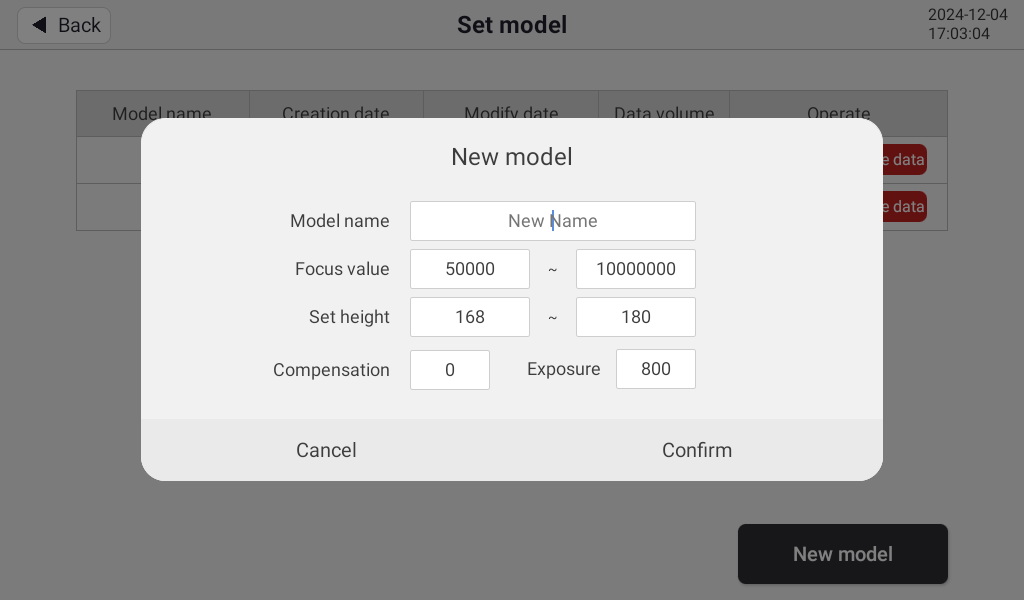
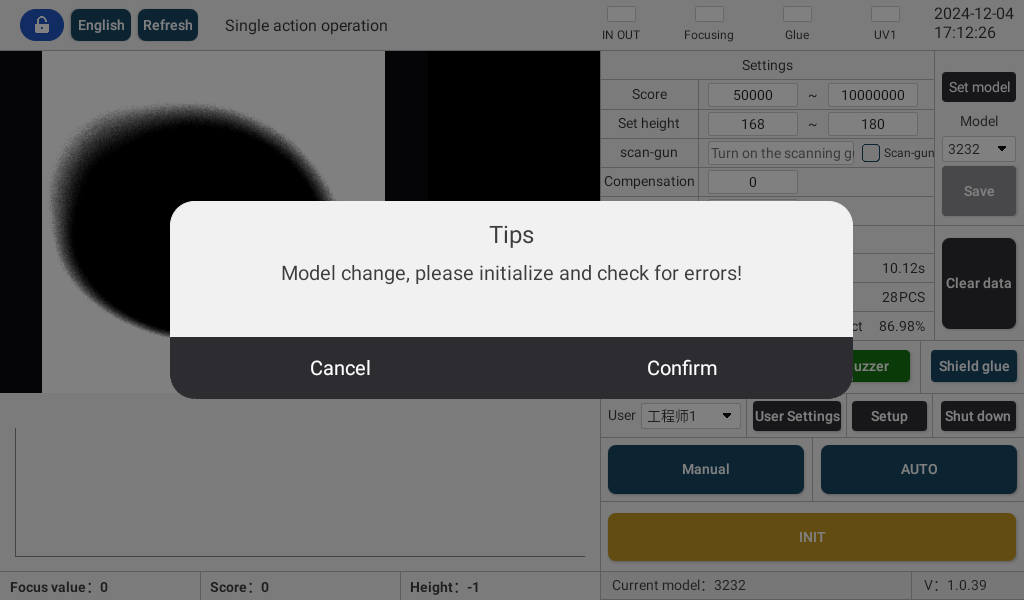
-3>In the new pop-up window, enter the name of the new model, and the system will automatically copy all the parameters of the previous model being worked on. After entering the correct model name, click OK.
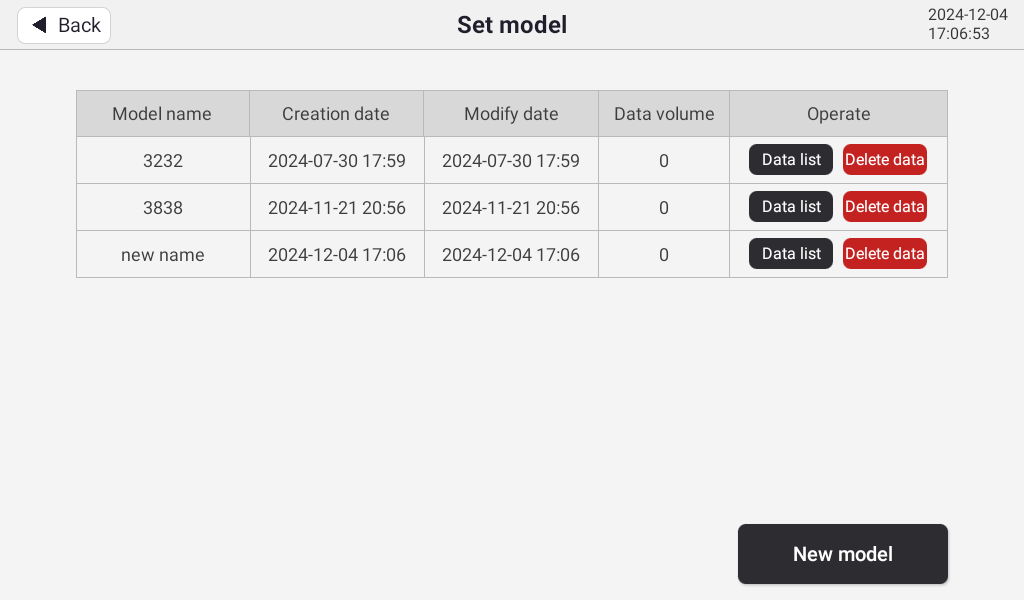
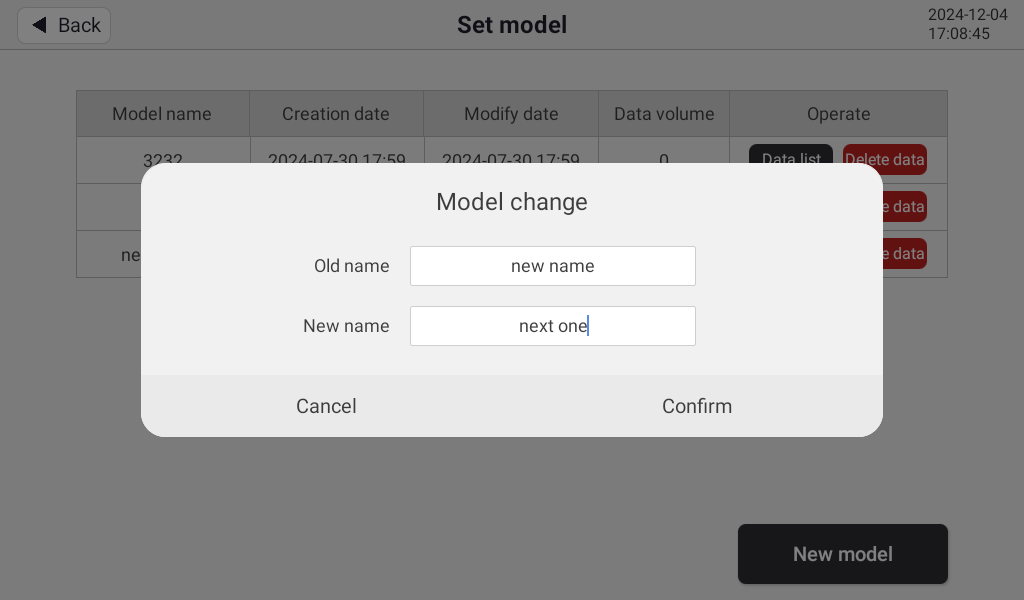
-5>Return to the main interface, select the newly created model from the down arrow of the model, click OK to switch to the new model, and change the parameters in the new model.
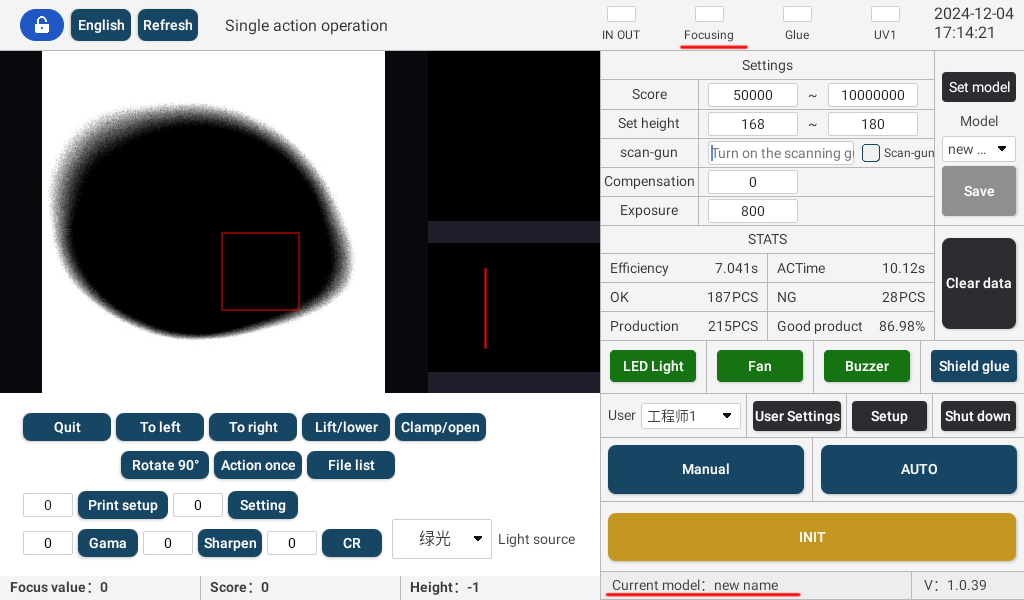
-7>Click on the 'Focus' button in the top focusing status bar to turn on the white background light of the height background light.
-8>After focusing the sample module, place it on the focusing station, long press the top right corner to open the hidden menu, press 【 lift/lower 】, and place the module on top.
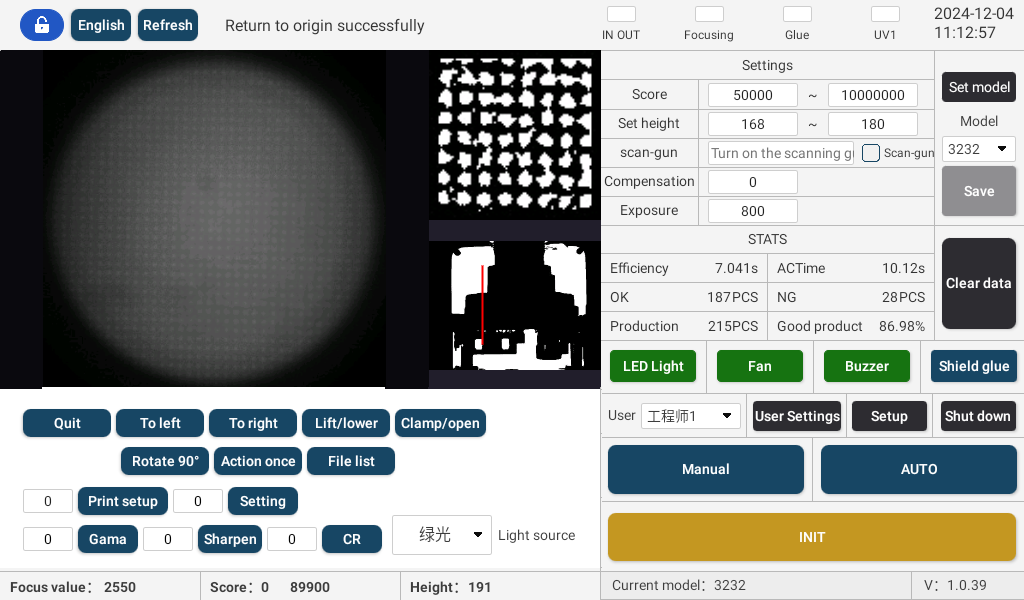
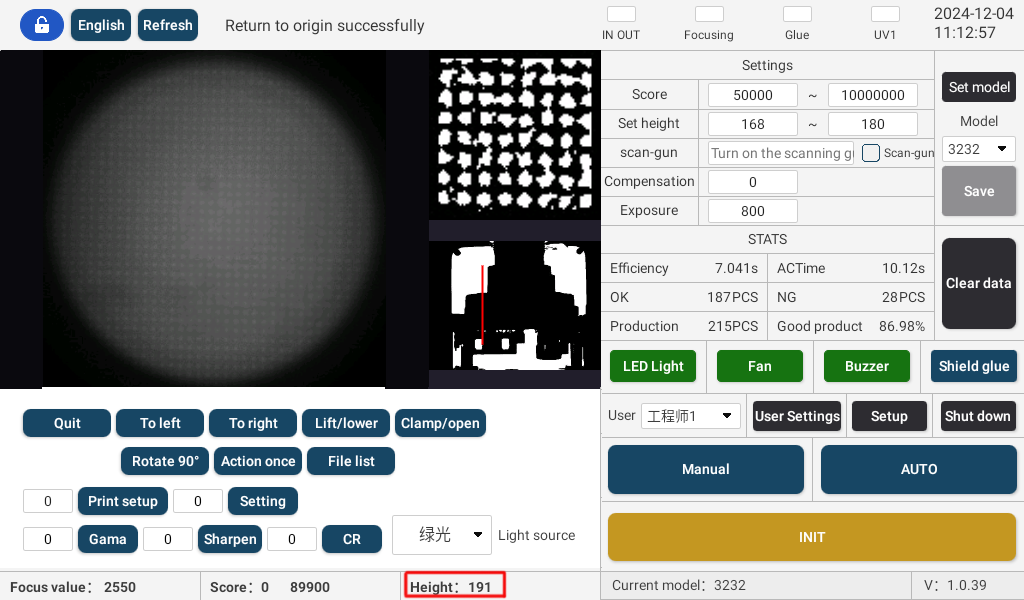
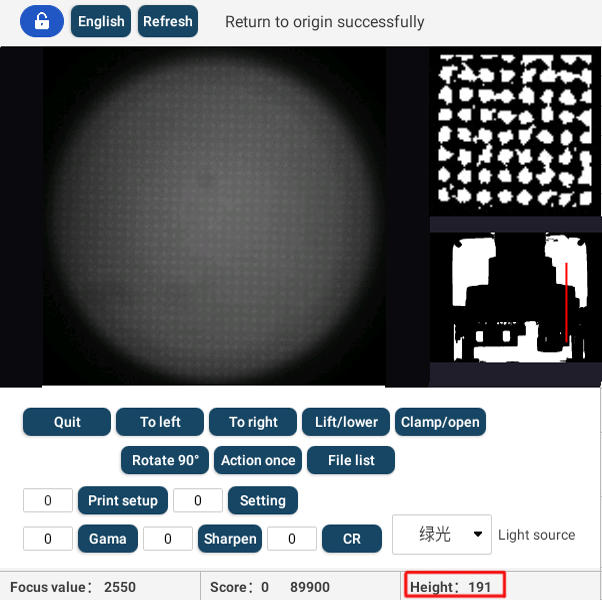
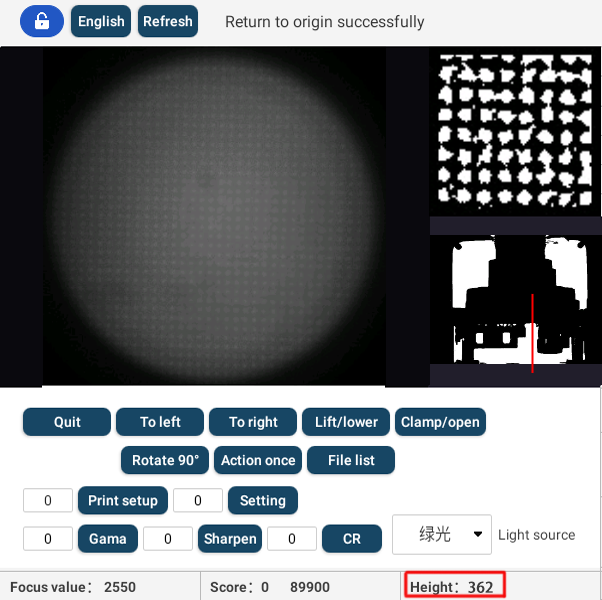
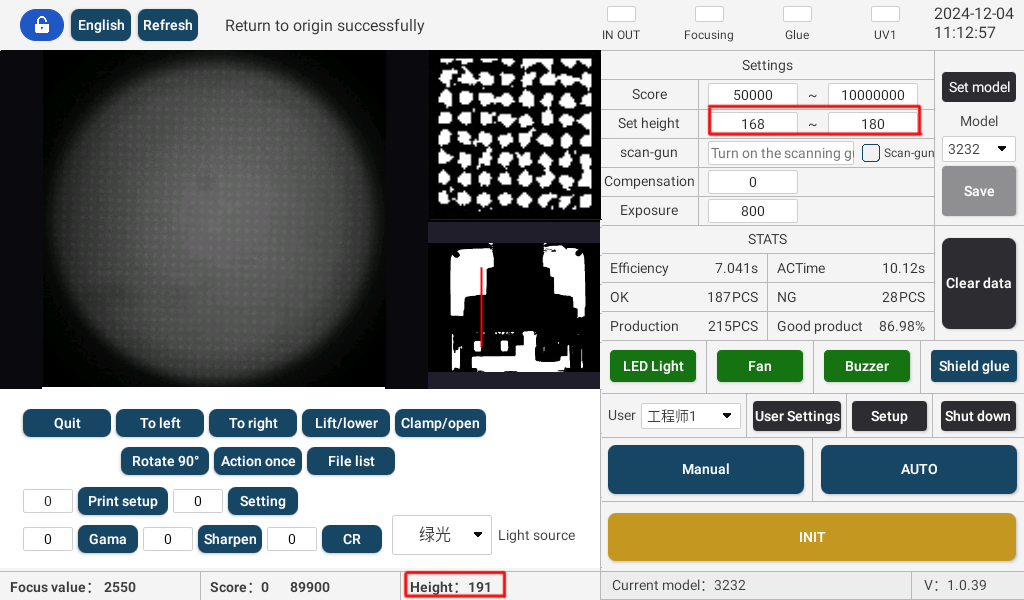
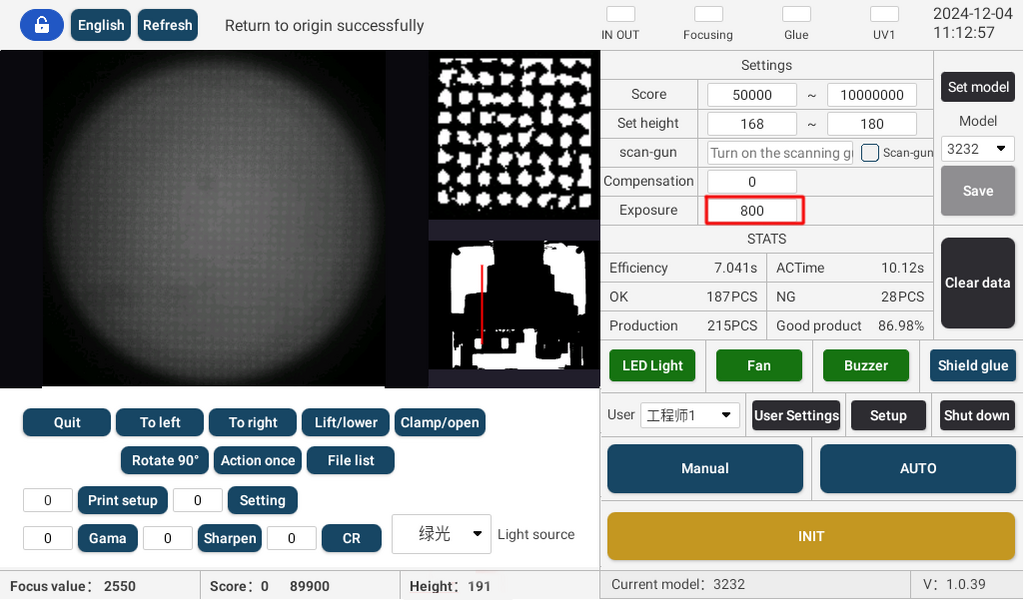
-12>Press once to focus downwards, place the module up, and long press to close the hidden menu.When the hidden menu is closed, the red line for detecting height cannot be moved.
-13>Click on the 'Focus' button in the top status bar to automatically perform a focusing process.
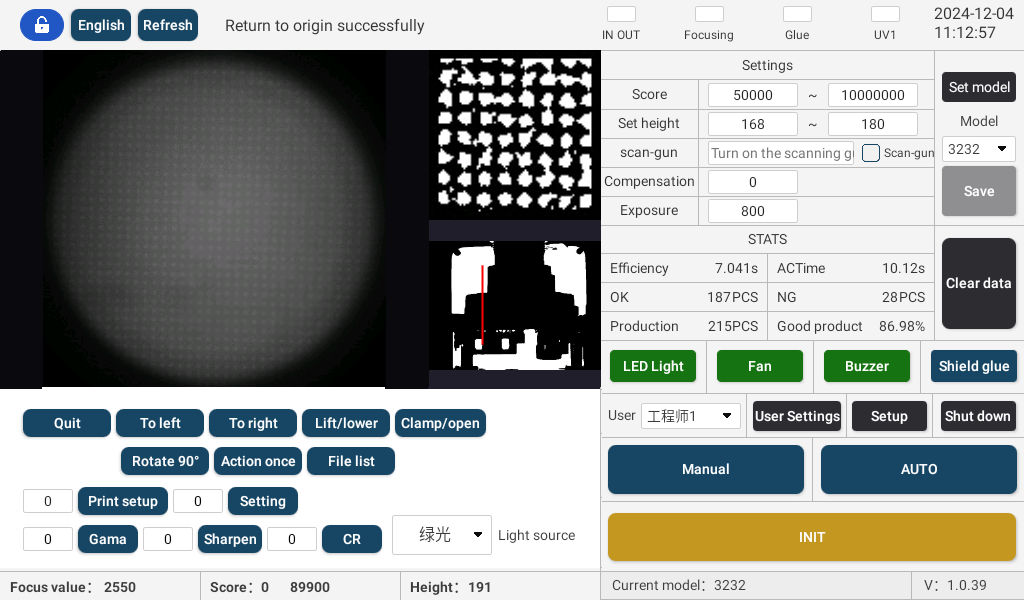
Reference (set1/set2/set3)
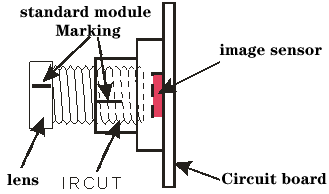
<for example>
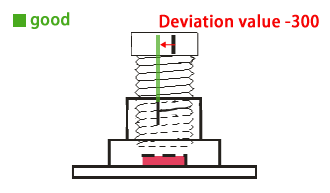
-16>If the lens needs to be rotated in reverse and filled with positive values, adjust the size of the values according to the actual situation. Click on the 'Focus' button in the top status bar, and the system will automatically perform a focusing process once.
Repeat the above process to align the position adjusted by the system with the manually adjusted position.
The size of the numerical value should be fine tuned according to the actual situation. Once the settings are complete, click the save button to transfer the current parameters to the current model.
-17>The size of the numerical value should be fine tuned according to the actual situation. Once the settings are complete, click the save button to transfer the current parameters to the current model.
(All parameters set on the homepage will take effect immediately, but they will not be saved in the model. Click the save button to save them. When exiting debugging mode and returning to the homepage, various parameters will be automatically saved in the parameters of the current model.)
-18>Initialize and perform automatic operations
10、Adjustment of dispensing height
-1>Needle up and down adjustment by using the joystick
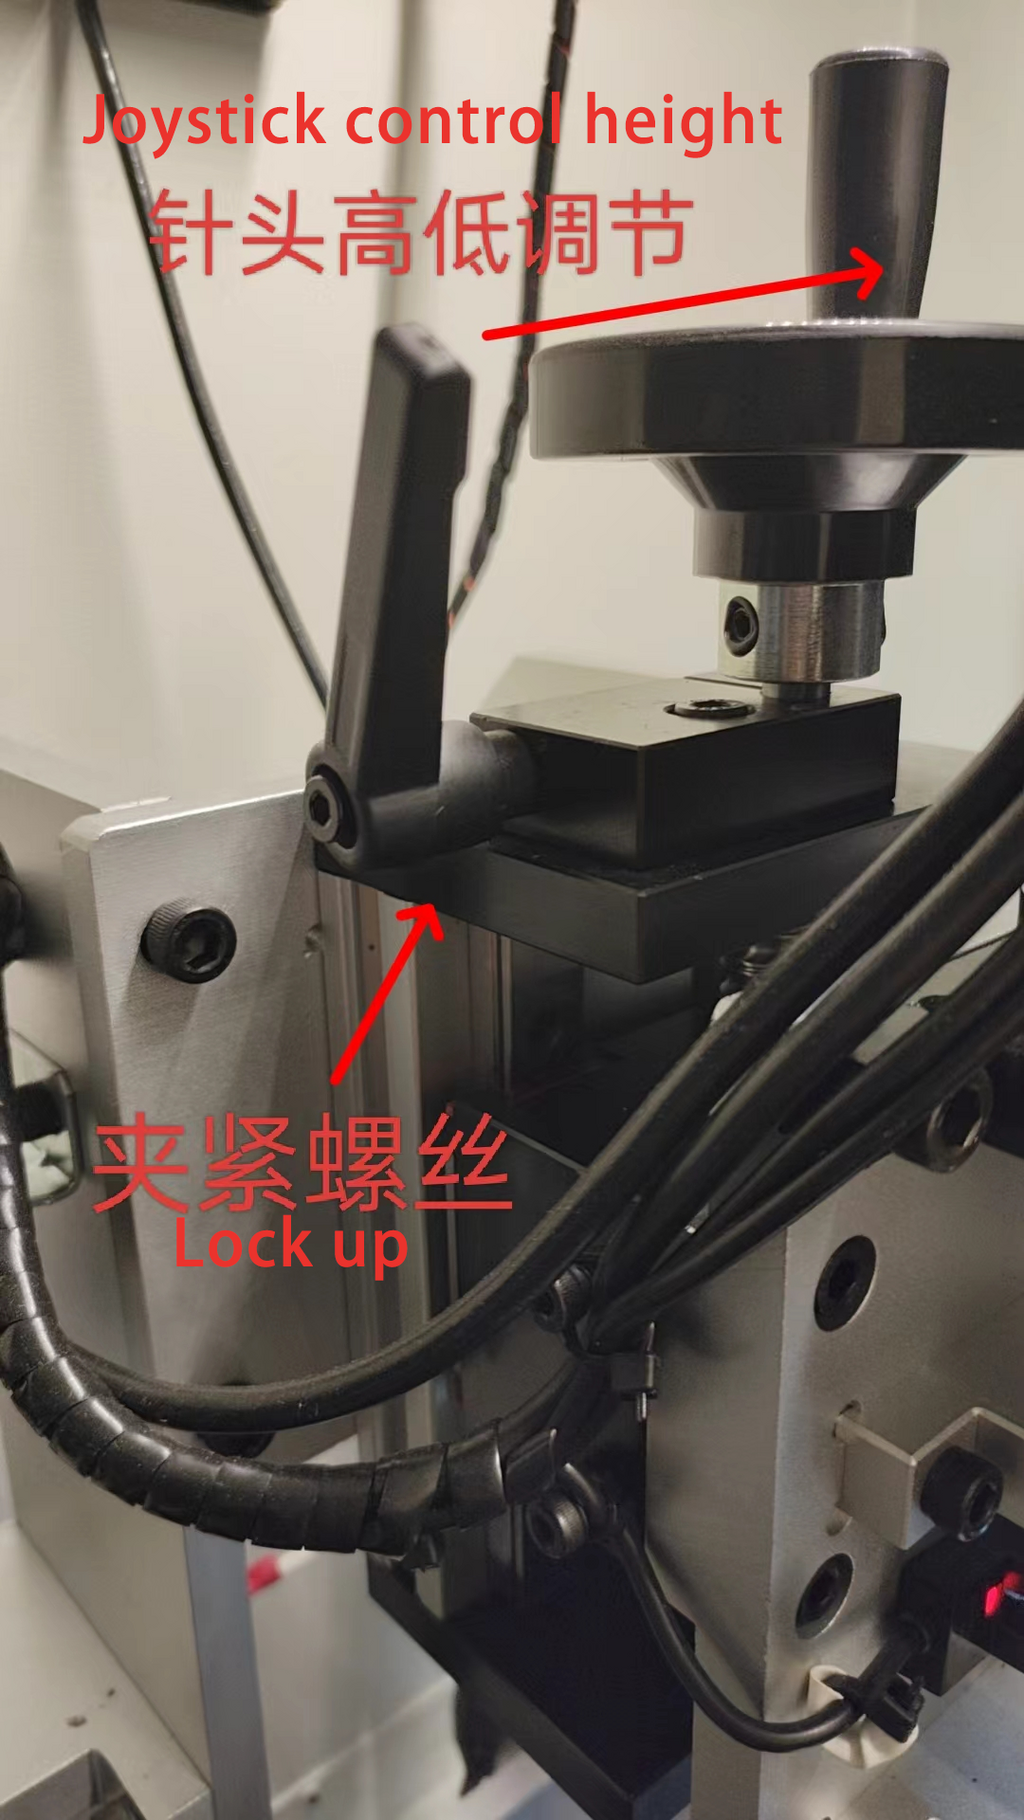
-2>First loosen the clamping screw, then adjust the height of the needle and lock the clamping screw.
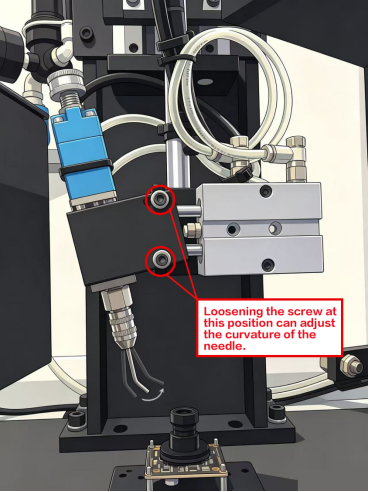
-3>Adjustment of needle opening and closing degree
Loosen the two adjustment screws a bit first, then rotate the opening and closing degree of the needle to the appropriate position, and then tighten the two adjustment screws.
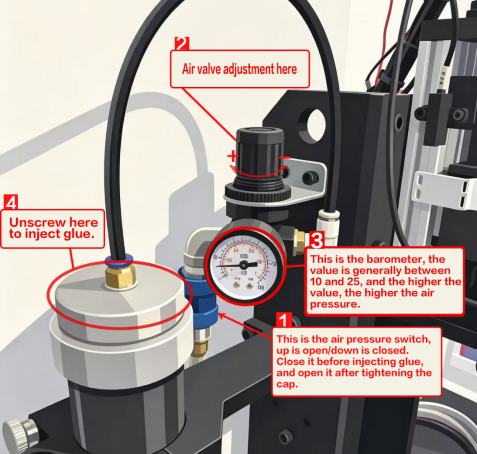
-4>Addition of UV glue
Pull down the air valve first and turn off the air pressure. Then turn the thread of the rubber drum cover counterclockwise to loosen it and unscrew the cover. Pour the glue into the glue bucket and tighten the lid clockwise. Then push the air valve upwards to increase the air pressure.
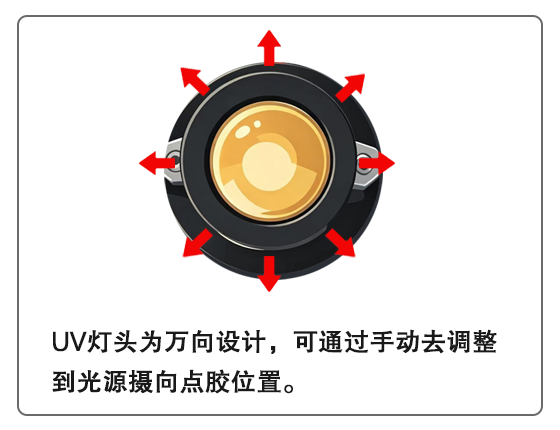
8[UV Lamp Station Setup]
8.1 Internal view of UV lamp
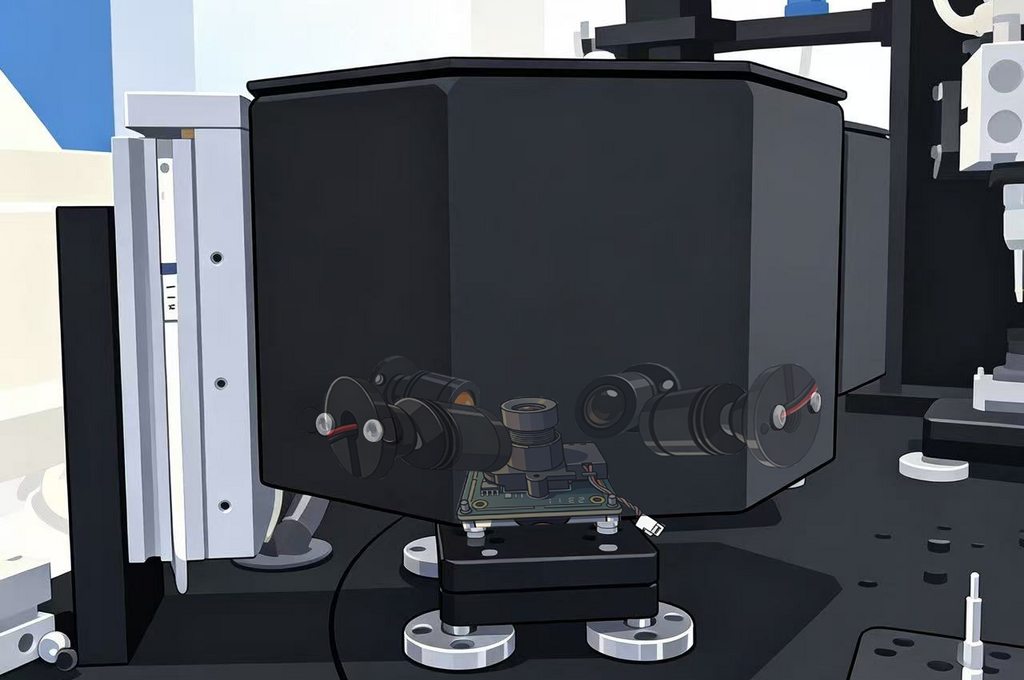
8.3 The UV light exposure time is between 4000 and 6000 milliseconds. It varies depending on the glue, and some special glues may require longer exposure time.
The above is the operating instructions for the AF-9119 machine.
-END-
-END-

Visit the website to learn more about the products.
http://www.zc-elec-equip.com/
http://www.zc-elec-equip.com/
Copyright © 深圳市志翀电子科技有限公司
www.zc-elec-equip.com
手机:15815544490 深圳市宝安区沙井街道衙边第一工业区A1栋二层
自动聚焦机,自动调焦机,自动对焦机,,安防摄像头自动调焦机,自动清洁组装机,全自动清洁组装调焦机,自动聚焦机AF-9118,自动调焦机AF-9119,无线IRCUT
本站部分图文来源网络,如有侵权问题请通知我们处理!
建网站维护
- 在线服务
-


